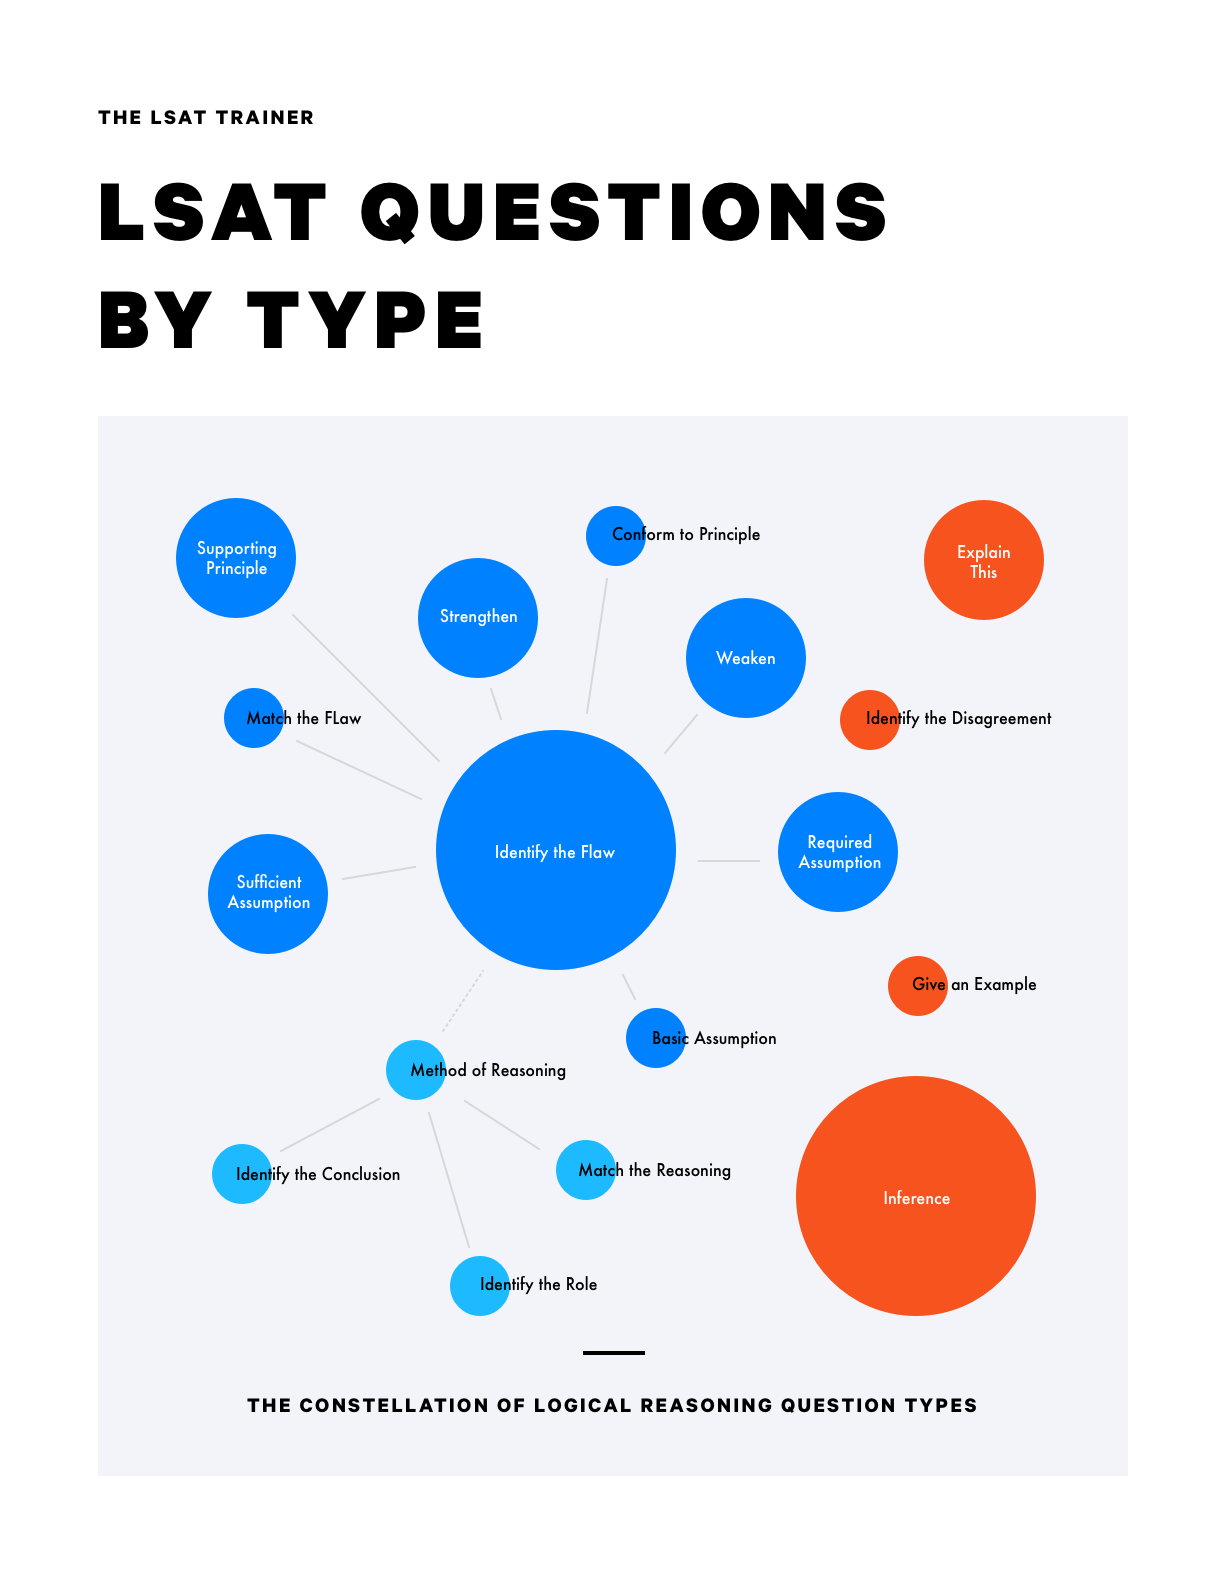
Game 1
Step 1
Per the given scenario, write out the seven elements to be placed - F, G, H, L, M, P, and S - and lay out the seven positions to be filled in order.
Step 2
Per the first rule, notate that H comes after F and before S.
Step 3
Per the second rule, notate that P must immediately follow G.
Step 4
Per the third rule, notate that L cannot be one of the first four manuscripts written.
Step 5
Per the fourth rule, notate that M cannot be one of the final four manuscripts written.
Step 6
Per the fifth rule, notate that H was not written fifth.
Game 2 (Option 1)
Step 1
Per the given scenario and the first rule, we can write out the six elements to be placed - dishes 1, 2, 3, 4, 5, and 6 - and we can lay out three spaces each for three shelves - top (t), middle (m), and bottom (b), with the understanding that not all slots will be filled.
Step 2
Per the second rule, we can notate that 2 must be above 6.
Step 3
Per the third rule, we can notate that 6 and 5 are stored on consecutive shelves.
Step 4
Per the fourth rule, we can notate that 1 and 4 cannot be stored on the same shelf.
Step 5
We can notate that 3 is not mentioned in any of the rules.
Game 2 (Option 2)
Step 1
Per the given scenario and the first rule, we can write out the six elements to be placed - dishes 1, 2, 3, 4, 5, and 6.
Step 2
Per the given scenario, first, and second rules, we can set up three frames, representing the different options for where the 2 and the 6 can be placed: since 2 must go above 6, either 2 can be placed on the top shelf and 6 on the middle, 2 on the top shelf and 6 on the bottom, or 2 on the middle shelf and 6 on the bottom.
Step 3
Per the third rule, in the first frame, 5 can be on the top shelf or the bottom shelf - just not the middle shelf, and we can notate that.
Step 4
Per the third rule, in the second frame, 5 must be on the middle shelf, and we can notate that.
Step 5
Per the third rule, in the third frame, 5 must be on the middle shelf, and we can notate that.
Step 6
Per the fourth rule, we want to notate that 1 and 4 can’t go together.
Step 7
We can notate that 3 is not mentioned in any of the rules.
Game 3 (Option 1)
Step 1
Per the given scenario, we can write out the four elements to be placed - F, G, H, and I - and lay out two rows of assignments - one each for the different types of orders: juices and snacks.
Step 2
Per the first rule, we can notate that for snacks F goes before H.
Step 3
Per the second rule, we can notate the G cannot get juices fourth.
Step 4
Per the third rule, we can notate that G is the third school to which snacks are delivered.
Step 5
Per the fourth rule, we can notate that the first school for juices is the same as the final school for snacks.
Step 6
We can notate that I is not mentioned in any of the rules.
Game 3 (Option 2)
Step 1
Per the given scenario, we can write out the four elements to be placed - F, G, H, and I - and lay out two rows of assignments - one each for the different types of orders: juices and snacks.
Step 2
Per the first rule, we can notate that for snacks F goes before H.
Step 3
Per the second rule, we can notate the G cannot get juices fourth.
Step 4
Per the third rule, we can notate that G is the third school to which snacks are delivered.
Step 5
Per the fourth rule, the first element assigned to juices must be the fourth element assigned to snacks. We can infer that there are just two options for which element can go into those positions: H and I. And we can create frames around those two possibilities.
Step 6
In the first frame, per the rules we’ve already covered, we know that G must go in either 2 or 3 for juices, and G must go in 3 for snacks, the latter of which leaves F and I as the remaining two elements for snack positions 1 and 2.
Step 7
In the second frame, per the rules we’ve already covered, we know that G must go in either 2 or 3 for juices. In snacks, G must go in 3, and, since F must be before H, F must then go in 1 and H in 2.
Step 8
We can notate that I is not mentioned in any of the rules.
Game 4
Step 1
Per the given scenario, we can write out the five elements to be placed - F, G, H, K, and L, and the three types of assignments to be filled - R, S, and T.
Step 2
Per the given scenario and the first rule, create two frames -- one in which F is assigned to R and K assigned to T, and another where F is not assigned to R and K is not assigned to T.
Step 3
Per the second rule, we can notate that either F or G (but not both) must be alone.
Step 4
Per the third rule, we can notate, in each frame, that H must be assigned to S.
Step 5
In the first frame, we can infer that F, not G, must be alone, and thus G and L must be assigned to S or T.
Step 6
We can notate that L is not mentioned in any of the given rules.